

Mastering Ship Placement
An X-Wing (TM) Turn Zero Article by 2013 World Champion Paul Heaver

The space combats of X-Wing™ are fast and furious. You and your opponent jockey for position early in the game, and then as you fly your squads at each other, your laser cannons, missiles, and ion pulses strip away starfighters’ shields and blast through their hulls. Which squad will emerge victorious? The result often comes down to choices made before the first shot was ever fired.
In his “Turn Zero” articles, reigning World Champion Paul Heaver offers a look at one of the most critical components in mastering the game… getting started.
Previously, Paul explored the importance of asteroid placement. Today, as you race your starships through the asteroid field toward your foes, Paul discusses the strategic concerns involved in placing your ships at the start of your game, stressing the step’s vital importance in ensuring that you ultimately line up strong volleys of fire in the opening rounds of combat.
2013 X-Wing World Champion Paul Heaver on Placing Your Starships
In my last column, I went over determining how much of an impact you want asteroids to have on your game, and where to place them to achieve that goal. This article continue to focus on the beginning of the game by exploring ship placement.
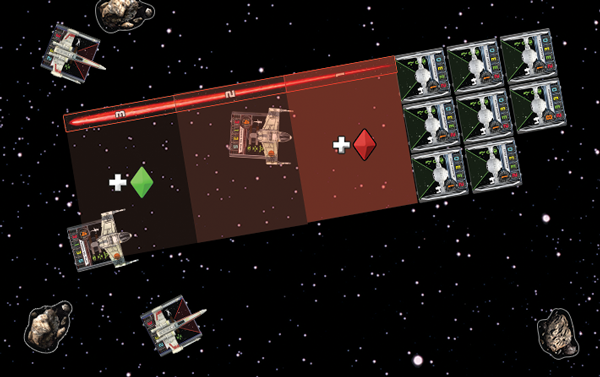
To simplify things, your goal in the opening round of conflict in X-Wing is to have all of your weapons pointing at the opposing ship you want to destroy first. You also want to have all your ships within the same range band of your target. You want to be in the same range band so that you aren’t presenting your opponent with an obvious target. If all of your ships are in range three of the opposing fleet, except for one at range two, then your opponent can fire all his weapons at the range two ship, while some of yours suffer from range penalty when they fire. The game is won and lost with the bonuses and penalties that one die can make, so you want to maximize them whenever you can.
X-Wing is a game of squad-based combats, and as players line up multiple shots, the impacts made by extra attack and defense are quickly multiplied.
Maximizing Your Maneuvers
The easiest way to end up with an ideal formation at the beginning of combat is to fly your ships in formation from the beginning. A lot of times, I see new players spread their ships along the deployment zone. Splitting up is almost always a mistake. It is a high-risk gambit: If you can orchestrate all of your ships to enter the same range band at the same time, then your opponent will have to fight with half of your ships behind him or to the side. However, in my experience, the more common result of splitting your deployment is that your opponent concentrates on part of your force with his or her entire force, while some of your ships arrive late and miss the critical first round of fire. This is disastrous.
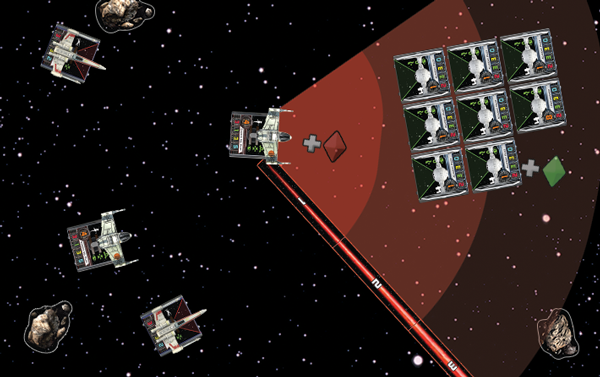
If we explore the engagement illustrated in the previous image from the Rebel player’s perspective, we see that he has no clear target with his closest B-wing, while his other ships are at range “3” from the Imperial squad. On the other hand, the Imperial player has flown in formation and has multiple range “2” shots at the Rebel player’s lead B-wing, making it an obvious target for early elimination.
The only time I would suggest splitting up is when you have one extremely maneuverable ship with a high pilot skill value, plus a lot of experience flying it. Then, you start the flanker away from the rest of your fleet, and try to approach the enemy fleet at a time when it would be a bad idea for them to pounce on your flanker, either because there’s an asteroid in the way of the turn to face him, or because the rest of your fleet will get behind their units.
If you’ve watched any high-level X-Wing games, you might have also noticed that in high-level play, most players start in the corners. Why is this? One reason is that the edge of the board is your ally. It is impossible to be attacked from outside of the board, so you can set up your squad, knowing that your most important ships – for example, “Howlrunner” or Biggs Darklighter – will end up in the back of your formation when you want them there. You know, at some point, you will turn toward the center, so you can plan for it with your asteroid and ship placement. For example, with my World Championship build, I would often measure out an asteroid and place it where I knew it would protect Biggs three turns later. I knew this from practicing my setup and knowing that my opponent would be set up in or near the opposite corner.
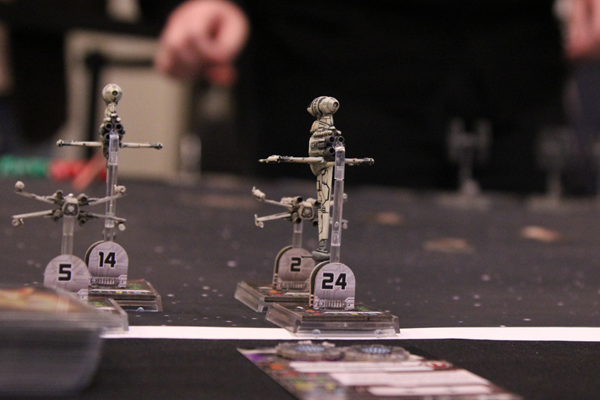
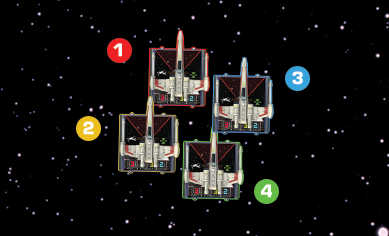
Paul Heaver’s opening formation from the 2013 World Championship Final. Note how Biggs Darklighter (ship number “5”) is positioned behind the rest of his squad and offset slightly toward the edge of the board. This sets him up to draw enemy fire at range “3” during the initial round of combat.
If you set up in the corner and your opponent sets up in the middle, it becomes very difficult for him to effectively bank in and attack you. On the opposite side of your ships is the edge of the universe, so Koiogran turns and other maneuvers are more limited when a slight misplay could fly a ship off the board.
Also, don’t forget to place your lower pilot skill ships in front of higher skill ships. This includes putting lower skilled ships closer to the center of the board: When you turn towards the center, you don’t want your ships with higher pilot skills suddenly end up in front. Those ships will activate after your ships with lower pilot skills, and blocking those ships with lower pilot skills will unnecessarily limit your maneuvers.
Flying in Formation
So, if the best advice is to fly in formation, what formations work?
TIE fighter swarm formations are fairly well-documented. Many fans have posted diagrams that show different swarm setups.
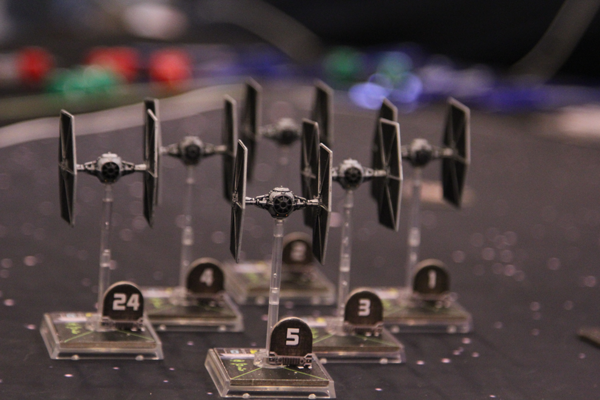
Dallas Parker flies his TIEs in formation during the 2013 World Championship Final.
One new formation that’s been picking up steam is what I call a “pinwheel” formation. Instead of lining up your ships in a square or rectangle, you place the ships offset from one another slightly.
- After placing your first ship, your second – instead of being directly behind it – is placed close to the first ship but half a ship length to the side.
- Then, the next ship is placed – instead of directly to the side – close to the side of the first ship and half a length behind it.
- The fourth ship is placed in the open spot to make four of the ships look like a pinwheel.
As a result, they rotate and react to opposing movements very well: You can bank or turn the ships, and they will not crash into one another. This is unlike a standard square formation, where two ships in line with one another, if not given sufficient separation, will collide if they both do the same bank. Try the pinwheel at home, and see how it works for you!
Different Dials. Different Setups.
While the pinwheel works for multiple ships that can perform the same maneuvers, as is the case with a swarm of TIE fighters, I prefer a nice line for my rebel ships. If you watch the recorded video of my World Championship matches, you’ll see I quickly form a long column of ships, with Biggs to the side. This is so that when I turn the ships towards the center, they’ll all be shoulder-to-shoulder and at the same distance from the enemy, with Biggs providing protection in the back.
If the enemy fleet encounters you in a column while you are in a line, you will often win. All of your ships will be able to focus fire on their closest ship, while their ships will be spread across multiple range bands. Flying in a tight line makes bank maneuvers difficult, but if you can work around that difficulty by varying your bank speeds or using Advanced Sensors, you can make it work.
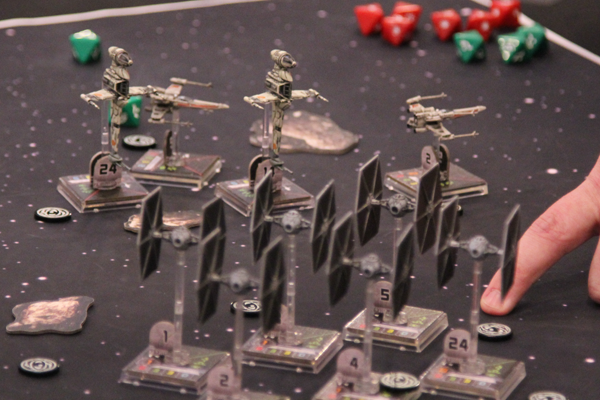
Paul Heaver’s X-wings and B-wings hold a line as they approach Dallas Parker’s TIE swarm during the 2013 X-Wing World Championship Final.
That’s all I have room for now for ship placement. Next time, I’ll look more at crafting a battle plan that can carry you toward victory!
Thanks, Paul!
Newer players frequently overlook the importance of the game’s early stages, but by following Paul’s advice, you’ll learn how to fly like an ace in no time!
What other advice can you find or offer about the opening moments of X-Wing? Head to our community forums and join the discussion!
…